Google Extensions That Can Help Students Learn (part 1)

Lately I have been testing out some Google Extensions that are supposed to help with accessibility for student who have special needs. I was surprised by how many are out there. I also think that they can help all students learn. Extensions are attached to your browser. You have to be in your Chrome browser, not Internet Explorer or FireFox. You also must sign in. To do that, look next to the minimize and “X” at the top right corner of Chrome, there is a man icon. Click on it and sign in with your @jcboe.k12.al.us account. Now no matter what computer you are on, the extensions will be there.

file

I am only going to list 5 at a time. That way it is not a huge list that can be overwhelming. Try these 5 and I will add 5 more to a new post later this week!

To get the free extensions visit the Chrome Store: https://chrome.google.com/webstore

If your school has Chromebooks these will really change your students with special needs’ lives.

Here is a list that I think will options that your students will benefit from:

Extensity

This extension really has nothing to do with accessibility, but some of these apps need to be turned off and on quickly. Get this first.

Announcify

Announcify will read a webpage for you. It also blur everything else on the page. The students will only see the paragraph or selection being read. This is not my favorite but does a decent job.

Chrome Vox

This one is from Google will read your entire screen, not just a webpage. It will put a box around what is wanted to be read. You can also tab it to the next area. If you have a chromebook it can be turned on in the OS and run the Chromebook with out even viewing the screen. I was surprised at how powerful this actually is, imagine a kid that can’t read being able to have it read a book from Google Books to him. Make sure you turn it off in Extensity when you don’t need it because it will drive you crazy.

Clearly

Clearly is from Evernote. Clearly takes away distractions inside of websites. It will just show the content that is needed to be read. It hides all of the adds and menu bars. It will also let you highlight and it will save the highlights and page to your Evernote account.

Color Enhancer

This extension is also from Google. It will change the color hue on your screen for students that are color blind. They can move the filters so colors that may be similar to their eyes will have a large contrast. If blue words are written on a yellow background, most could see the difference but those that are color blind would not see the words as well. This extension will make a greater contrast.

I will add more later! Try these extensions on yourself then see if they can help your students! If you download them and then decide you want them off your computer, you can go to Chrome settings (see the 3 lines under the “X” in top right corner? Click it and choose settings) and click extensions on the left menu. There is a check box to disable and trash can to delete.
Kahoot It!

This blog post is going to focus on Kahoot It! A fun formative assessment to use with your students!

In Kahoot you can create quizzes or search for quizzes that are already made by other teachers. The students can use any device to answer the questions on the quiz. They can go to kahoot.it or download the free app. Students are given a game code and can log in to the quiz. They put in their name or if you want to give them privacy, a number earlier assigned. Once everyone is in, start the quiz. After each question, it will give the students points based on how fast they answered correctly. Those who answered wrong will not receive points.

After you finish a quiz, you can download a spreadsheet of the results that will show you how each student answered the questions.

Links you will need for using Kahoot:
To create an account: getkahoot.com
To log in and create a new kahoot: create.kahoot.it
For students to take the quiz: kahoot.it

Best part – as usual – It is free!

Below is a quick tutorial on how to use Kahoot with your students.

TACKK

Welcome back to school! I know the blog has not updated in a while due to the crazy end of school. I have a few post now written and they will update on Mondays.

Today the site we are going to look at is TACKK. It is a simple way to make an online poster, website, or just a great place to share information. Tackks can be used in so many ways, by teachers and students. I have created a Tackk of how to use Tackk! Take you time a scroll through it below!

**the parent permission form does not show up here, but if you click on the black bar it will take you to the site and it will be there**

Can’t you just imagine all the great ways that Tackk can be used?! I can see it as a great starting point for PBL activities, a place to post a video to get students excited about it, store links to get them started in the right direction, and even could be their presentation. When you use it with your students, we would love to see their work! And as always, if you have any questions, we love to help!

Using Maps for Portfolio or Formative Assessment

Our Google Edu accounts are so much more than just a place to store files and type documents. Google Apps for Education (GAFE) have so many different opportunities and lessons that students can access with their single log in. Log into your Google account and you can access the menu of apps (the 9 squares) at the top right of the google.com page. Once you click on the menu, you will see “maps” as one of the app options.

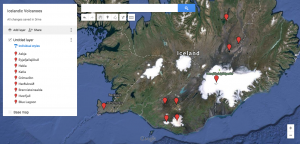
In maps, you can create your own and share them with others. Students can use typical Google share settings so multiple students can collaborate or they can turn it in to teacher by sharing link in Google Classroom. Imagine having students log each place they learn about on the map. Not only do they drop a pin at the location, they can add paragraphs of information as well as a slide show of pictures of the location. Also, all of these pins can be saved on one map. So by May, they would have an entire map of all the locations that were covered in your class. They can also share this map with you and you can grade them as a formative assessment.

Here is an example of a completed map: http://goo.gl/8A2yqn

Screen Shot 2015-04-13 at 8.09.07 PM

Lessons where this could be used in your classroom: In social studies, labeling locations of battles during wars, having students plot the travel of explorers or pioneers (you can actually plot distances between places). Another use as a way to locate and reflect on what happened at concentration camps. Locations in science during plate tectonic/dynamic earth unit. During a current event lesson in science students can track hurricanes (it even has hurricane/tropical storm shaped pins) or making a map of historical weather events like tornadoes or floods. A family and consumer science teacher who was in my PD with social studies teachers said that she was going have her students do this with recipes around the world. World Lit classes can mark where authors were from or where the stories take place. Economics classes can make maps of data/income in difference places.  I am sure there are so many other ways to use this in your classroom! I would love to hear your ideas!

Here are step by step instructions on how to build these maps: http://goo.gl/A0VF5y

Hello JefCoEd!

Welcome to the new Instructional Technology blog! Our goal is to post at least once a week things we are learning and sharing. It is hard to get to every school, so this is a great place to reach all teachers. Also, once of us may be teaching teachers something that you could use, now you know what is out there. It will also be a great reference place for reminders of how websites or apps that you forgot how to use.

You can subscribe to the blog using RSS or you can get email alerts. Just sign up for email alerts in the menu on the right side of the screen.

We have enjoyed getting to know so many of you over the last few months! Know that we are here for you, feel free to contact us at any time!

Amanda and Channon

Skip to toolbar